


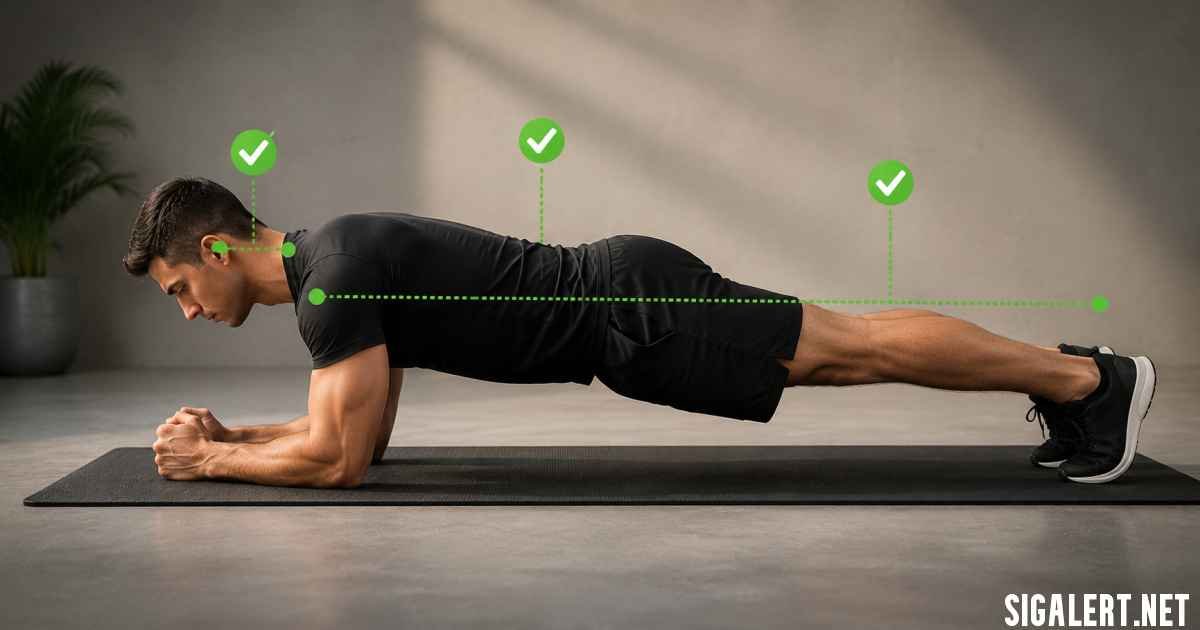
If you’re searching for forearm plank proper form, chances are you want to maximize every second of this powerful exercise. The forearm plank is one of the most effective bodyweight movements for strengthening your core, improving posture, and building full-body stability. However, fitness professionals estimate that many people perform planks with incorrect technique, which can reduce the exercise’s effectiveness and place unnecessary stress on the lower back and shoulders.
In this complete 2026 guide, you’ll learn the correct forearm plank form, the biggest mistakes to avoid, the science-backed benefits, how long to hold a plank, effective variations, and tips to prevent lower back pain. Whether you’re a beginner or an experienced athlete, mastering proper form will help you get better results while reducing your risk of injury.
What Is a Forearm Plank and Why Does Proper Form Matter?
The forearm plank is an isometric core exercise, meaning your muscles contract without changing length while you hold a stable position. Instead of performing repetitive movements like crunches, the forearm plank trains your body to maintain stability by keeping your body in a straight line supported by your forearms and toes.
Using proper forearm plank form is essential because good technique allows you to activate multiple muscle groups simultaneously, including the:
- Transverse abdominis (deep core muscles)
- Rectus abdominis
- Internal and external obliques
- Glutes
- Shoulders
- Chest
- Quadriceps
- Back muscles
Poor technique, on the other hand, often causes the lower back to compensate for a weak or disengaged core, potentially leading to discomfort or strain.
Benefits of Proper Forearm Plank Form
- Builds a stronger core
- Improves posture
- Enhances balance and stability
- Strengthens the shoulders and glutes
- Supports spinal stability
- Helps improve athletic performance
- Engages multiple muscle groups simultaneously
Remember, 30–60 seconds with perfect form is far more beneficial than several minutes with poor technique.
Forearm Plank Proper Form: Step-by-Step Instructions
Following the correct setup ensures you receive the maximum benefit from every plank.
Step 1: Position Your Elbows
Place your forearms on the floor with your elbows directly beneath your shoulders. Your forearms may remain parallel or your hands can be lightly clasped—choose whichever feels most comfortable while maintaining shoulder stability.
Step 2: Set Your Feet
Extend your legs behind you and tuck your toes under. Beginners may find a hip-width stance more stable, while advanced exercisers can place their feet closer together for a greater challenge.
Step 3: Engage Your Glutes
One of the most overlooked coaching cues is to squeeze your glutes. Activating the glute muscles helps prevent the hips from sagging and supports proper pelvic alignment, reducing stress on the lower back.
Step 4: Brace Your Core
Imagine someone is about to gently punch your stomach. Tighten your abdominal muscles without sucking your stomach inward excessively. Your goal is to create firm, steady tension while still breathing naturally.
Step 5: Maintain a Straight Line
Your body should form one straight line from:
- Head
- Neck
- Shoulders
- Hips
- Knees
- Heels
Keep your:
- Head neutral, looking at the floor.
- Shoulders active, pressing gently away from the ground.
- Hips level, avoiding both sagging and excessive lifting.
- Legs straight, with your quadriceps engaged.
Step 6: Breathe Normally
Many people unknowingly hold their breath. Instead, maintain slow, controlled breathing throughout the exercise while keeping your core engaged.
Step 7: Hold the Position
Focus on maintaining total-body tension instead of simply watching the timer. Beginners can start with 20–30 seconds while maintaining excellent technique.
7 Common Forearm Plank Mistakes to Avoid
Even experienced gym-goers occasionally make form errors. These are the most common mistakes.
1. Hips Dropping Too Low
Sagging hips increase pressure on the lumbar spine and reduce core engagement.
Correction: Tighten your core and squeeze your glutes to keep your hips aligned with your shoulders.
2. Hips Too High
Raising your hips into a pike position shifts the workload away from the core.
Correction: Lower your hips until your body forms a straight line.
3. Elbows Too Far Forward
Placing your elbows ahead of your shoulders places unnecessary stress on the shoulder joints.
Correction: Keep your elbows directly under your shoulders.
4. Looking Forward
Looking ahead strains the neck.
Correction: Keep your neck neutral and direct your gaze toward the floor.
5. Holding Your Breath
Breath-holding increases fatigue and can elevate blood pressure.
Correction: Maintain slow, steady breathing.
6. Collapsing the Upper Back
Allowing the shoulders to sink reduces stability.
Correction: Actively press your forearms into the floor and maintain shoulder engagement.
7. Forgetting the Legs
A plank is a full-body exercise—not just an ab workout.
Correction: Engage your quadriceps, glutes, and calves throughout the movement.
How Long Should You Hold a Forearm Plank? What the Research Suggests
One of the biggest misconceptions is that longer always means better. In reality, quality matters far more than duration.
General recommendations include:
| Fitness Level | Recommended Hold |
|---|---|
| Beginner | 20–40 seconds × 3 sets |
| Intermediate | 45–60 seconds × 3–4 sets |
| Advanced | 60–90 seconds × 4 sets |
Many strength and conditioning professionals recommend increasing the difficulty rather than simply extending plank duration once you can comfortably maintain excellent form for around 60–90 seconds.
Instead of attempting five-minute plank challenges, consider adding movement or resistance to continue progressing.
A helpful tip is to record yourself from the side using your smartphone. This makes it easy to identify whether your hips are sagging or rising too high.
Forearm Plank Variations and How to Prevent Lower Back Pain
Once you’ve mastered the standard forearm plank, you can increase the challenge with more advanced variations.
Side Forearm Plank
Targets the obliques, hip stabilizers, and shoulder muscles.
Forearm Plank with Leg Lift
Lift one foot several inches while maintaining stable hips. This variation increases the demand on both the glutes and core stabilizers.
Weighted Forearm Plank
Advanced exercisers may carefully add resistance using a weight plate placed across the upper back under supervision.
Long-Lever Plank
Moving your elbows slightly forward increases the challenge by lengthening the lever arm, requiring greater abdominal activation.
How to Fix Lower Back Pain During Planks
If your lower back hurts while planking, your technique likely needs adjustment.
Try these corrections:
- Reduce your hold time. Stop before your form breaks down.
- Squeeze your glutes harder to support pelvic alignment.
- Brace your core consistently throughout the exercise.
- Slightly tuck your pelvis if your lower back arches excessively.
- Practice kneeling forearm planks until you can comfortably hold proper alignment before progressing to your toes.
If pain continues despite correcting your technique, stop the exercise and consult a qualified physical therapist or healthcare professional. A properly performed forearm plank should primarily challenge your core, glutes, shoulders, and legs, not cause significant lower back pain.
Final Forearm Plank Checklist
Before every plank, quickly review this checklist:
- ✅ Elbows directly under shoulders
- ✅ Core braced
- ✅ Glutes engaged
- ✅ Straight line from head to heels
- ✅ Legs active
- ✅ Shoulders stable
- ✅ Slow, controlled breathing
Mastering these fundamentals will place you ahead of many gym-goers who rely on longer hold times instead of better technique. A well-executed 30-second forearm plank is often more effective than a poorly performed three-minute hold.
Start with 3 sets of 20–30 seconds, prioritize excellent form over duration, and gradually increase the challenge as your strength improves. Consistent practice, proper technique, and progressive overload are the keys to developing a stronger core, improved posture, better stability, and safer movement patterns in 2026 and beyond.